 I did this pretty little cake for my second Wilton Cake Class -- Course 3. I love it!! All the decorations are made from fondant and the kids left it alone for a few hours before the ribbons started getting eaten... so, good job, guys! LOL
Saturday, February 20, 2010
LAVENDER PRESENT CAKE!
I did this pretty little cake for my second Wilton Cake Class -- Course 3. I love it!! All the decorations are made from fondant and the kids left it alone for a few hours before the ribbons started getting eaten... so, good job, guys! LOLSunday, February 14, 2010
ORANGE DINOSAUR INVASION!!
My daughter Mary Pearl turned 5 on February 10th and wanted an orange dinosaur cake for her birthday.... *RAWR*
.
Sugar cookies... orange color-flow icing with purple fun accents... these were totally fun to do and I will be practicing more with this!

Getting ready to make the cake!
 Rocks and fern fronds made out of fondant!

Outlining the dinosaur. Next time I will use an icing one shade darker than the main color to outline. Live and learn. LOL

All done!!! I love this pan -- thank you, Heather, for cleaning house and passing it to us!

.
Sugar cookies... orange color-flow icing with purple fun accents... these were totally fun to do and I will be practicing more with this!

Getting ready to make the cake!
 Rocks and fern fronds made out of fondant!
Outlining the dinosaur. Next time I will use an icing one shade darker than the main color to outline. Live and learn. LOL

All done!!! I love this pan -- thank you, Heather, for cleaning house and passing it to us!

Saturday, February 6, 2010
COMING IN FEBRUARY:
Mary Pearl is turning 5 and wants an orange dinosaur cake... and our little friend Karl is turning 4 and he is all boy! So I will be working up an all-boy cake for that kiddo. I can't wait!
THE SUPERHERO INVASION!
Also in January I had the fun of doing two cakes for two brothers, Leo and Logan. They wanted superhero cakes, and so here we go!
.
The filling for the Superman cake:
 I thought it would be fun to have Superman colors coming out when the cake was cut. *WOOP*
.
The fondant is ready to go.
 Here is the first layer of Superman's shield:
 And the second layer laid in place:
 I found his symbol online, printed it out the size I wanted and used it as a stencil. Sweet!
 Adding fun bubbles of color around the bottom:
 Everything is in place:
 I bummed myself out with this cake only because I forgot to leave room for writing! I was so used to making cakes for my own children, and I never write on their cakes, I forgot to leave enough space for my words! *haha* But it worked out this time... Next time I definitely won't forget! That's the great thing about mistakes. :-)
. 
 A Deflated Soccer Ball Bubble Cake?
.
The filling for the Superman cake:
 I thought it would be fun to have Superman colors coming out when the cake was cut. *WOOP*
.
The fondant is ready to go.
 Here is the first layer of Superman's shield:
 And the second layer laid in place:
 I found his symbol online, printed it out the size I wanted and used it as a stencil. Sweet!
.
Adding some rockin' Go-Superman Stars:
 Adding fun bubbles of color around the bottom:
 Everything is in place:
 I bummed myself out with this cake only because I forgot to leave room for writing! I was so used to making cakes for my own children, and I never write on their cakes, I forgot to leave enough space for my words! *haha* But it worked out this time... Next time I definitely won't forget! That's the great thing about mistakes. :-)
.
Logan got a Spider-Man cake:

Now... when you have a leftover 6-inch white cake, and leftover red, yellow and blue fondant, AND leftover icing... what do you get?
 A Deflated Soccer Ball Bubble Cake?
A Killer Klowns from Outer Space Cake?
A Melting Rainbow Star Trek Alien Amoeba Cake?
It was seriously good. The kids were stealing the sugar bubbles all day. LOL
It was seriously good. The kids were stealing the sugar bubbles all day. LOL
RUSSELL-BROWN WEDDING CAKE
I was asked to do my first wedding cake by my sweet friends, Raven Russell and Ian Brown. The wedding was on January 16, 2010, at the Liberty Theater in downtown Astoria. The reception was on the 3rd floor of the Elks building in the most beautiful ballroom I have ever seen. It was truly a magical day uniting two of my favorite people and I am so glad I was able to be a part of it!!
.
Okay -- THIS IS NOT MY CAKE! This is the INSPIRATIONAL PHOTO Raven found -- she loved the snow groom and bride on top, and wanted them for her cake, too. I said they were probably made from fondant, so that was my first order of business.
.
 (2 inches across)
 (under 2 inches)
 (about 3-4 inches)
.  The 14-inch round bottom layer:
 This was my first time making a cake this large. It was pretty daunting, but I just worked one step at a time and tried not to freak out about anything. LOL This is the best chocolate cake in the world, and it's so easy anyone could do it. It is even the one Martha Stewart likes the best! (Shhh.... it's on the back of the Hershey's unsweetened cocoa can!)
.
For any cake over 10 inches in diameter, you are supposed to use one of those little cups in the center to help the cake bake evenly. It was my first time to use one of those, too. All kinds of firsts here!! I baked two chocolate layers and then put them together, because first I tried to bake a three-inch layer that I would then tort (separate) and fill, but that cake not only didn't bake well, there was no physical way to cut and separate it and not have a giant mess on my hands.
.
So -- note to self: for large diameter pans, bake one layer at a time!
.
The top layer... a white cake. Delicious!!
 With icing:
 The fondant is ready for rolling:
 This was my first time for covering a cake with fondant, and I was so impressed with the ready-made fondant from Wilton, I have no words. Roll it out, pop it on, trim. The only place where I deviated from any of the instructions I read was I found it easier to cut the excess fondant off from around the cake using kitchen scissors instead of a knife.
  Since I knew this cake would have ribbon on every level, I knew I was getting a pass this time on having the bottom of the fondant perfectly flat, so that was a little break for me. By the time I did another cake two weeks after the wedding that was covered in fondant, I had it down and the sides were smooth and perfect. *WOOP*
 The groom looks like he's falling backwards here, but that was fixed as the days moved forward. He just needed to be squished back into shape. LOL
. The fondant ready to go!!
  I was so worried about covering a cake this large, but it just went on perfectly. Amazing.
 Then the middle layer was ready for some attention.
 The top and middle tiers were both white cake, with the 6-inch having a lemon filling and the middle 10-inch tier with the strawberry filling. Both fillings were made from scratch and both were seriously delicious.
 This is the only time during the wedding cake process where I lost my cool with my children. They chose to run through the kitchen about five minutes after I took this photo.

 And was it ever worth it!!!!

.
Okay -- THIS IS NOT MY CAKE! This is the INSPIRATIONAL PHOTO Raven found -- she loved the snow groom and bride on top, and wanted them for her cake, too. I said they were probably made from fondant, so that was my first order of business.
.

The rest of their cake plan was for three layers, coordinating ribbon around each layer in silver, black and red; and snowflakes.
.
But first things first, the snow bride and groom.
I had planned to make them out of clay so Raven and Ian could dust them forever. I bought black and orange Sculpey clay (which I then fell in love with... coolest stuff EVER!) and my first job was to make the eyes, buttons, and the top hat for the little groom. Then came the tiny carrot noses. Sculpey clay bakes to a hard finish which is why I did these first.
. I had another product, an air-drying porcelain clay, that I was planning on using for the bodies. Not good. It sucked!! Not only did it have a stiff texture, but when it started drying it not only turned GRAY but it began cracking. REALLY NOT GOOD! I gave up and made their bodies out of fondant, which should dry to a nice hardness and they will still be able to keep them for years to come. The snow people are shown below, but first -- onto the snowflakes!
 I drew snowflake designs onto paper, placed wax paper over the design and piped each design out with royal icing. After one pan of snowflakes, I started getting the hang of it, and realized I needed to be smoothing them down as I went in order to get the smooth finish I wanted to see:
 (2 inches across)
 (under 2 inches)
  (about 3-4 inches)
.
The large snowflakes took nearly an hour each to do, but I did get much faster the more I did. I would pipe sections at a time, smoothing down with water as I went. The royal icing wanted to dry a little too quickly for me, but overall -- GORGEOUS! And very delicate. I used the recipe from Wilton that uses powdered meringue instead of egg whites, which means the snowflakes were very edible. And trust me, they were delicious!
.
Strawberries from Sauvie Island, Portland, Oregon, for the filling:
 The 14-inch round bottom layer:
 This was my first time making a cake this large. It was pretty daunting, but I just worked one step at a time and tried not to freak out about anything. LOL This is the best chocolate cake in the world, and it's so easy anyone could do it. It is even the one Martha Stewart likes the best! (Shhh.... it's on the back of the Hershey's unsweetened cocoa can!)
.
For any cake over 10 inches in diameter, you are supposed to use one of those little cups in the center to help the cake bake evenly. It was my first time to use one of those, too. All kinds of firsts here!! I baked two chocolate layers and then put them together, because first I tried to bake a three-inch layer that I would then tort (separate) and fill, but that cake not only didn't bake well, there was no physical way to cut and separate it and not have a giant mess on my hands.
.
So -- note to self: for large diameter pans, bake one layer at a time!
.
The top layer... a white cake. Delicious!!
 With icing:
 The fondant is ready for rolling:
 This was my first time for covering a cake with fondant, and I was so impressed with the ready-made fondant from Wilton, I have no words. Roll it out, pop it on, trim. The only place where I deviated from any of the instructions I read was I found it easier to cut the excess fondant off from around the cake using kitchen scissors instead of a knife.
 .
All done!
 Since I knew this cake would have ribbon on every level, I knew I was getting a pass this time on having the bottom of the fondant perfectly flat, so that was a little break for me. By the time I did another cake two weeks after the wedding that was covered in fondant, I had it down and the sides were smooth and perfect. *WOOP*
.
May I have the pleasure of introducing Mr. and Mrs. Snow Groom and Bride!!!
The groom looks like he's falling backwards here, but that was fixed as the days moved forward. He just needed to be squished back into shape. LOL.
The bottom layer of the cake getting iced!
 The fondant ready to go!!
  I was so worried about covering a cake this large, but it just went on perfectly. Amazing.
You can see my little hills and valleys around the bottom, though. No worries! It didn't matter!
See? ----->

Making more icing....
 Then the middle layer was ready for some attention.
  The top and middle tiers were both white cake, with the 6-inch having a lemon filling and the middle 10-inch tier with the strawberry filling. Both fillings were made from scratch and both were seriously delicious.
 .
Adding the fondant to the middle layer -- look how it drapes!! I love fondant!!!

All done (even the snowflakes!) and having a trial-run in the kitchen:
 This is the only time during the wedding cake process where I lost my cool with my children. They chose to run through the kitchen about five minutes after I took this photo.
 .
Now the reason I chose to use this stand from Wilton is that I have never attempted a stacked cake, plus I was worried about transporting the cake to Astoria over our rather bumpy, windy road. Of course I watch all of the cake shows and I watch them carry the big, giant cakes up and down stairs, in and out of vans, through New York City traffic and all that, but I didn't want to risk destroying the cake because this was Raven and Ian's only wedding! So I chose to go this route, and each cake was decorated on its own plate, transported in its own box and then I put them together at the Elks ballroom. My biggest wish is that they had optional separator columns that were shorter. I didn't need this much space between the layers.
.
.
I went ahead and added the snowflakes the day before, hoping and praying they would make it to the reception hall. They were SO DELICATE, I can't even tell you, but they looked so beautiful. I packed all of the extra snowflakes in a box with batting and they all made it to the reception hall, too.
.
The other element Raven and Ian wanted on their cake were tiny silver balls, just a few, around the snowflakes, but instead of using the elusive disco balls popular with Christmas cookies the world over, I chose to dot on royal icing and paint it with a silver decorative powder. It's edible, of course, and you mix it with a tiny dot of clear vanilla extract and paint away.
.
I truly amazed myself, because the cake was done the Friday afternoon before the Saturday wedding. I had it packed and in the truck before dinner. I couldn't believe I wasn't up until midnight sweating over last-minute details. *go me!*
.
At the reception hall:


 And was it ever worth it!!!!
HAPPY VALENTINE BIRTHDAY HEART CAKE
For Mary Pearl's second birthday, but her first with us, I went with a loose Valentine's theme, since her birthday is February 10 and she'd only been home since December. (Mama was brain-fried with another kid in the house! *ack*).
This is a square cake, and a circle cake cut in half to form the rounded portions of the heart:
 The icing is still the store-bought icing, but for this it works great, because I wanted it to look really soft and swirly.
This is a square cake, and a circle cake cut in half to form the rounded portions of the heart:
 The icing is still the store-bought icing, but for this it works great, because I wanted it to look really soft and swirly.
GINGERBREAD HOUSE AND M&Ms!!!
For Nathan's first birthday in America, he wanted a gingerbread house. But because he is new to this country, and had never made a gingerbread house yet, he didn't understand they are actually hollow! But he talked about gingerbread houses all year, screamed every time he saw a picture of one, and so that's what he wanted for his birthday.
And that's just what he got! Here is the tray of candy ready for cake construction times:
 Yes! Under all of this candy and icing and graham crackers is a delicious fudgey chocolate cake! When it was time to cut the cake, I was a little unsure how to proceed, but basically I popped off giant sections of roof and put them on a plate (they quickly disappeared, btw), and then the graham crackers by this time were soft and could be cut right along with the rest of the cake.

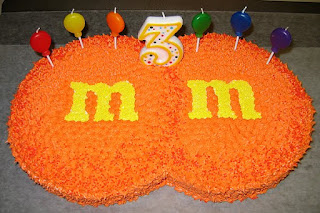
 When Mary Pearl turned 3, she was in love with M&Ms. ORANGE M&Ms, of course, and so for her I made a double M&M cake... which is perfect for her anyway, since her initials are M.M.!


And that's just what he got! Here is the tray of candy ready for cake construction times:
 The back of the gingerbread house:
 Yes! Under all of this candy and icing and graham crackers is a delicious fudgey chocolate cake! When it was time to cut the cake, I was a little unsure how to proceed, but basically I popped off giant sections of roof and put them on a plate (they quickly disappeared, btw), and then the graham crackers by this time were soft and could be cut right along with the rest of the cake.
 When Mary Pearl turned 3, she was in love with M&Ms. ORANGE M&Ms, of course, and so for her I made a double M&M cake... which is perfect for her anyway, since her initials are M.M.!


CASTLES IN THE AIR
Emily Rose's Princess Castle for birthday #4: the flowers are all made out of sugar cookie dough. This was still back in the day where I was not making my own icing. In addition to being expensive, you have no real control over the texture and it would melt rather quickly in the decorator bags. Solved that by making my own and using a stiffer recipe.
.
But back in the day, no one knew the difference! *yum*

Our little neighbor girl, Glori, had a birthday in the summer of 2009 and I made a Princess Castle cake for her, too. The good news is, by this time I was beginning to play with fondant, so all of her decorations are made from that. The bad news is, this is fondant I tried to make myself, and it was just not as smooth and pliable as the ready-made fondant from Wilton. It was still incredibly fun to make this cake, though!


The "sand" is actually light brown sugar patted lightly onto sand-colored icing. And it's okay if I never see that ocean set of decorations again, because now I use fondant to make the decorations!!


.
But back in the day, no one knew the difference! *yum*

Our little neighbor girl, Glori, had a birthday in the summer of 2009 and I made a Princess Castle cake for her, too. The good news is, by this time I was beginning to play with fondant, so all of her decorations are made from that. The bad news is, this is fondant I tried to make myself, and it was just not as smooth and pliable as the ready-made fondant from Wilton. It was still incredibly fun to make this cake, though!


The same pan can be used to make sandcastles... my favorite things. :-)
.
For James's 1st birthday, he got a sandcastle cake, complete with these adorable little ocean doo-dads I found in a random Mexican store in Hillsboro. (??) I still think it's weird I've only seen this set of decorations there. Ever.

The "sand" is actually light brown sugar patted lightly onto sand-colored icing. And it's okay if I never see that ocean set of decorations again, because now I use fondant to make the decorations!!
.
This is Daddy's birthday cake he took to work in August of 2009:

The homemade fondant was bugging me here when I made the seaweed... it just wasn't coming out smooth. It was drying out so fast! But I was extremely happy with the way the sea stars and sand dollars came out. But the pearls wouldn't come out round -- THAT is how weird the homemade fondant was!

Subscribe to:
Posts (Atom)